Connecting to SharePoint Online from console application with ADAL and PnP Core Component
Office 365 Developer Patterns and Practices Core component is designed to increase the productivity of developers when you are developing applications for SharePoint Online or for SharePoint on-premises. It encapsulates numerous complex operations to more streamlined methods and usage, so that developers can more efficiently concentrate on solving business problems. PnP Core component is released as Nuget package and can be used in provider hosted add-ins or from native windows applications, like with console applications. It’s also used by the PnP PowerShell CmdLets, which enables you to take advantage of the Core Component capabilities without the need of using Visual Studio.
There are currently two different versions of the PnP Core Component, one targeted for SharePoint Online and for SharePoint 2013 on-premises. SharePoint 2016 version is coming later 2016. Different versions are released due the differences in supported CSOM operations.
This is a blog post around using the PnP Core Component AuthenticationManager class to gain client context from console application using permissions granted from Azure Active Directory. This nicely demonstrates the abstractions what the PnP Core Component is providing by simplifying the needed code for typical operations with SharePoint. You can also find a video showing the below steps from the PnP Channel 9 video blog.
Video at Channel 9 PnP Video Blog.
Steps to connect to SharePoint Online with ADAL and Office Dev PnP Core Component
First we’ll need to register the application for the Azure Active Directory associated to the Office 365 tenant. This can be done from Azure Portal by moving to https://portal.azure.com and signing in with the account associated to the tenant.
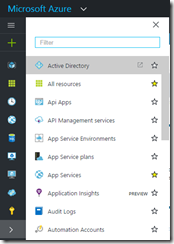
- Select Active Directory from the main menu
- Move to Application section in the Azure AD
- Click Add to add new application
- Click “Add an application my organization is developing”
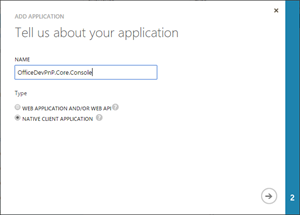
- Provide your application a name and select the type as Native Client Application
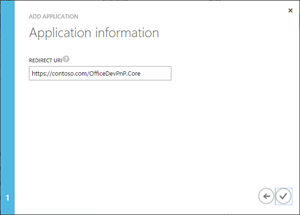
- Define redirect URI for your application. Notice that the value does not need to be a physical endpoint, but must be a valid URI.
- Click “Complete” so that your application entry is created to Azure Active Directory
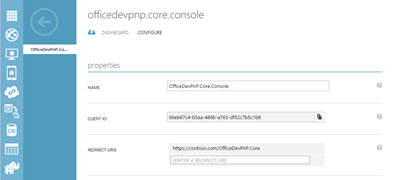
- Move to Configure section
- Copy Client ID and Redirect URI information, since these will be used when we connect to Office 365 or SharePoint Online from our console application.
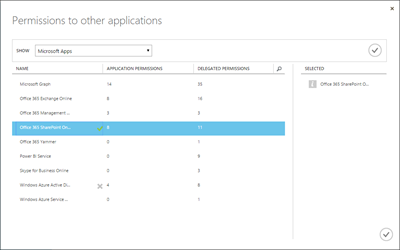
- Scroll down under the permissions to other applications section and click Add application
- Select Office 365 SharePoint Online
- Click Complete
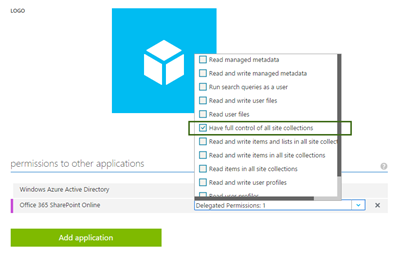
- Set “Have full control of all site collections” as the delegated permission for the application
- Click Save to complete the registration
Now we are all good from the Azure Active Directory side, so let’s proceed on the Visual Studio side.
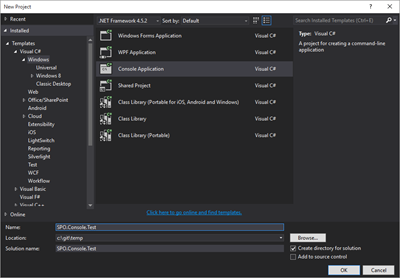
- Open up a Visual Studio and chose the Windows Console application as the project type
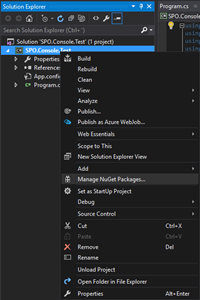
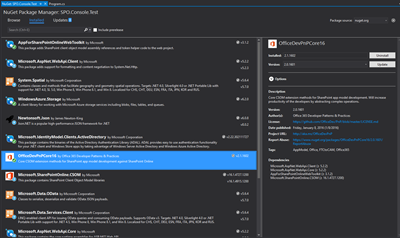
- Right click Visual Studio project and choose Manage Nuget Packages
- Install following Nuget packages – notice that Office Dev PnP Core component Nuget package will pull down automatically quite a few dependent Nuget packages as well to ensure that capabilities are working without issues.
- Microsoft.IdentityModel.Clients.ActiveDirectory – version 2.22.302111727 (at the time of the blog post)
- OfficeDevPnPCore16 – version 2.1.1602 (at the time of the blog post)
- Move to program.cs and update Main method as follows
 static void Main(string[] args)
 {

     using (var ctx = new AuthenticationManager().
             GetAzureADNativeApplicationAuthenticatedContext(
             "https://vesaj.sharepoint.com/sites/dev",
             "clientId", "redirectUrl"))
     {
         // Do your stuff
         Web web = ctx.Web;
         ctx.Load(web);
         ctx.ExecuteQuery();
         string title = web.Title;
     }
 }
- Update clientId and redirectURL in the GetAzureAdNativeApplicationAuthenticatedContext method call based on the registration you did in Azure Active Directory
- Add following using statements on the program.cs
 using Microsoft.SharePoint.Client;
 using OfficeDevPnP.Core;
- When you are done with the updates, full code should look something like following
 using Microsoft.SharePoint.Client;
 using OfficeDevPnP.Core;
 using System;
 using System.Collections.Generic;
 using System.Linq;
 using System.Text;
 using System.Threading.Tasks;

 namespace SPO.Console.Test
 {
     class Program
     {
         static void Main(string[] args)
         {

             using (var ctx = new AuthenticationManager().
                     GetAzureADNativeApplicationAuthenticatedContext(
                     "https://vesaj.sharepoint.com/sites/dev",
                     "66eb87c4-b5aa-486b-a763-df52c7b5c1b8",
                     "https://contoso.com/OfficeDevPnP.Core"))
             {
                 // Do your stuff
                 Web web = ctx.Web;
                 ctx.Load(web);
                 ctx.ExecuteQuery();
                 string title = web.Title;
             }
         }
     }
 }
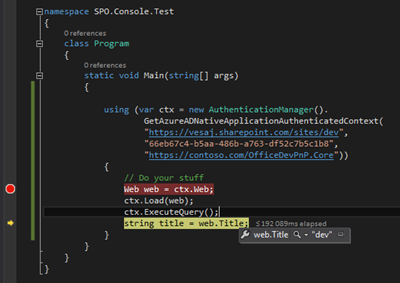
Set a break point for example on the ExecuteQuery method call and press F5 in the Visual Studio to start debugging the solution
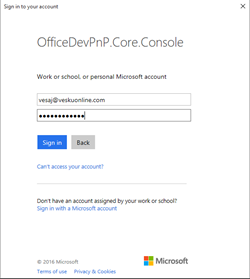
When ExecuteQuery method is called, you will see Sign in prompt to login with needed account to your tenant
- This way you do not need to store any login information on the caller side, needed information is rather prompted from the user.
Provide your user name and password and click Sign in button
- Confirm that you have access on the site collection in your tenant with only one line of code
That’s it. With PnP Core Component, you can significantly increase the productivity of your developers. In this case we used PnP Core Component within Console application, but more often it would be used within provider hosted add-ins. In those cases you’d not obviously use the native application option with the login prompt, but conceptually implementation or usage is exactly the same. There’s a separate PnP Core component version for SharePoint Online and for SharePoint 2013 on-premises.
Office 365 Developer Patterns and Practices
 Techniques showed in this blog post are part of the Office 365 Developer Patterns and Practices guidance, which contains guidance and reusable solutions for demonstrating different patterns and practices related on the development for Office 365 and SharePoint on-premises.
Check the details around PnP from dev.office.com at https://aka.ms/OfficeDevPnP. PnP Core Component is released as part of the monthly releases of PnP and you can find the source code for it from https://github.com/OfficeDev/PnP-sites-core. Please join us on sharing patterns and practices for the community for the benefit of the community. If you have any questions, comments or feedback related on this sample, blog post or anything on PnP, please use the Office 365 Developer Patterns and Practices Yammer group at https://aka.ms/OfficeDevPnPYammer.
“Sharing is caring”
